
Here is a 1000pt game using units from Mazinger Z. Player 1 (Toeizinger) has the Toei versions of Mazinger Z, Diana A and Boss Borot while Player 2 (Kikaiju) has Kingdan X10, Garada K7 and 2x Doublas M2 Kikaiju. You can find the profiles for these units on the MechaStellar game downloads page. The figures used are from the Go Nagai Robot Collection, you can find more information on Mazinger figures here.
The players are using the “Defend the City / Rampage” versus mode where one player is rampaging through the city and the other player is trying to stop them as soon as they can.
This post will be a turn by turn gameplay example using MechaStellar VER9.5 rules. This example does not cover individual rolls for the units such as evade or melee. If you are brand new to MechaStellar and want to see how the a turn goes from start to finish including every dice roll then check out this gameplay example using Mobile Suit Gundam’s 08th MS Team.
Below the break we will cover the game setup, deployment, and the 1st round of a 5 round game of MechaStellar. We will go by turn by turn each round and include some insights into the Gundam Tactics.
Table Setup
For this gameplay example we are using a 4ft x 6ft table (120cm x 180cm). You can use a smaller table such as a 4’x4′ but the players wanted a larger area to rampage around in.
For the Defend the City / Rampage game mode you will want 20-30 buildings.
We are using N-Scale models for buildings here but you can use whatever you have around the house that is vaguely building shaped such as boxes, cans, plastic packaging or styrofoam. The terrain page has examples of model buildings, folding cardstock buildings as well as using random junk for terrain.
The players both setup the terrain, they choose to keep most buildings spaced a decent ways apart that way it’s harder for the attacker to rampage and charge through several buildings at once. The Attacker gains both Momentum [M] and Victory Points (VP) for destroying buildings.
Deployment

In this game mode the players use an alternate deployment method where they can deploy anywhere on the battlefield as long as they are more than 16″ away from enemy units. The exception is you may deploy within 16″ as long as you are fully blocked by LOS terrain.
The player with the most models first, so the Kikaiju player places a Doublas M2, then the other player places Mazinger Z as close as she can hoping to take down Doublas M2 ASAP. The Kikaiju player then drops Kingdan to be close to Mazinger Z hoping to charge him in Round 1.
For those unfamilar with Mazinger Z, Mazinger is the original piloted Super Robot he is Black, Red and Grey/Silver and this figure has the large red jet scrander (winged jetpack). The original Mazinger anime was done by Toei, so to differentiate that version of Mazinger from the more recent Shin Mazinger it is often referred to as Toeizinger.
On the upper left is the two headed green and purple Doublas M2, on the right is the Red and Blue Kingdan with the horned helmet.
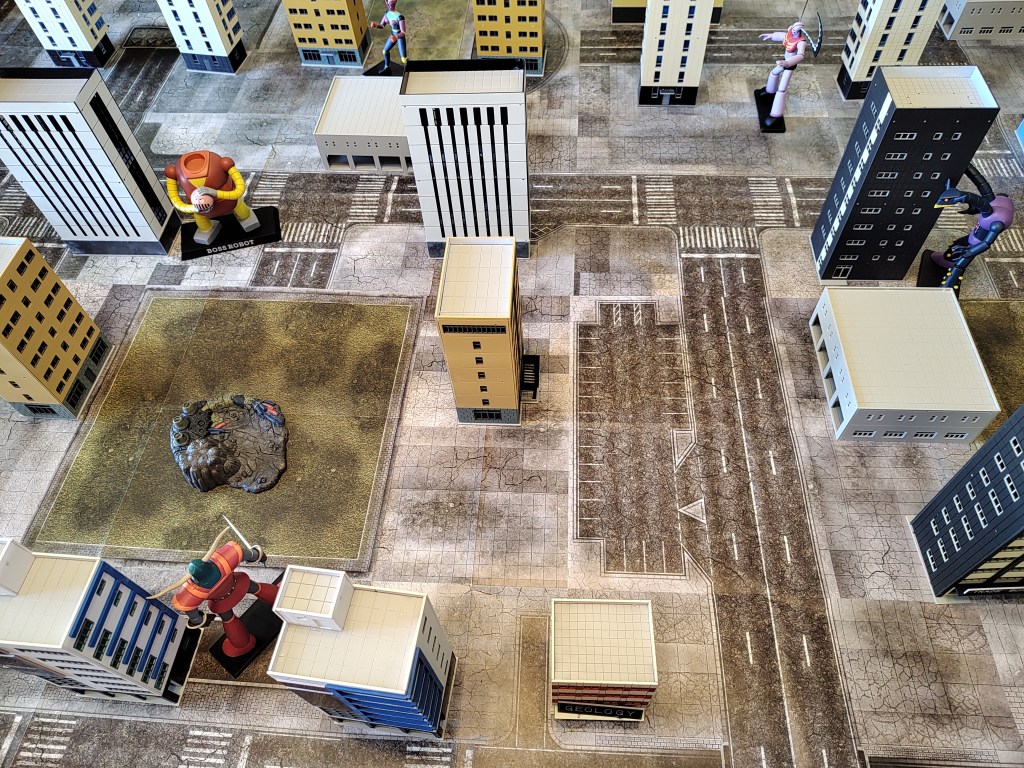
The Toeizinger player then places Boss Borot in the middle of the battlefield near Kingdan hoping to intercept him. The Kikaiju player places another Doublas M2 on the opposite side of the table hoping to destroy a number of buildings without interruption.
The Toeizinger player then places Diana A (purple and blue) not far behind Boss Borot as support with line of sight on both Kingdan and the 2nd Doublas. The Kikaiju player drops their last model, Garada K7, the purple/pink mechanical beast with giant blades on its head and a skeletal motif. They held onto Garda last, as he is most effective in melee range and so placing him as close to the long range Diana A will pay off in the short term.
Toezinger Army List and Tactics (1000pts)
- Mazinger Z (Toei) 500pts
- Commander: Galvanizing Display
- Diana A 300pts
- Ace Pilot Upgrade+50pts
- Boss Borot 150pts
The Toeizinger player chose Galvanizing Display as the Commander trait for Mazinger Z. It’s pilot Koji Kabuto, is a hot blooded young man and is always at the forefront of the battlefield. The Galvanizing Display commander trait gives [M+2] every time the unit is attacked.
While later depictions of Mazinger tend to emphasize how durable its Super Alloy Z construction is, the original TV show and manga often featured Mazinger taking serious damage on a regular basis. Thus in MechaStellar the Toei profile has a lower HP than the later Shin Mazinger profile, in exchange though it has a huge arsenal of weapons and additional actions to use them. If he gets in close he’s capable of incredible burst damage, and he’s got some good shooting options that can be used in melee combat as well with both the Rust Hurricane and Freezing Beam. With the Galvanzing commander trait, the extra Momentum will help keep Mazinger and the rest of the team alive.
Diana A is piloted by Sayaka Yumi, the player decided to use their last 50pts to upgrade her into an Ace Pilot which gives her a better passive defense with Dodge and Guard. It also gives her an additional pilot trait which she uses on Gunnery Expert which improves Precision & Barrage by 1, and reduces Rapid Fire penalties by 1 which will be very helpful for her Scarlett Beam. With good line of sight Sayaka can dish out a lot of shooting attacks, just keep her out of melee.
Last up we have Boss Borot, instead of being Boss Robot is mispronounced as Borot as part of the gag. Boss Borot is the comedic relief in Mazinger and sequel series Great Mazinger along with cameo appearances in Grendizer, it’s often a joke unit in Super Robot Wars (SRW) as well. Boss Borot is piloted by the three trouble makers Boss, Nuke and Mucha, with Boss often having an unrequited love for the series female pilots including Sayaka Yumi and later Jun Hono. One thing about Boss though is he’s a consistent and dependable friend to the other pilots, and while he’s often a coward he has his own moments of glory where he defends a childrens hospital with his run down robot even if it means he won’t survive.

Boss Borot is an unorthodox robot often jury rigged together by its pilots. As part of its comedic relief it is often dismembered by the enemy without any effort. It’s also known for having wacky gadgets like rocket powered skis, flying machines and even giant inflatable tubes to let it float in water. Boss has also been known to borrow weapons from others, there’s a fun episode in Great Mazinger where Boss uses the Drill Pressure Punch. All these events are represented by the Idiot Savant trait which has a chance to give bonus bonus movement and flight or even steal an enemy (or ally) weapon.
While it’s a low performance unit in MechaStellar it has great HP and decent Armor Save and Evade for its points making it an excellent screening or distraction unit. And who knows, if you get lucky, in previous games Boss has stolen both Kingdan’s sword and one of Doublas Heat Ray spewing head.
Kikaiju Army List and Tactics (1000pts)
- Kingdam x10
- Unstoppable Kaiju (Ace Pilot) upgrade +50pts
- Master Swordsman upgrade +50pts
- Commander – Three Times as Fast
- Garada K7 (250pts)
- 2x Doublas M2 (2x250pts)
Kingdan will be the leader of this rampaging horde of mechanical beasts (Kikaiju). The player controlling them decided to upgrade Kingdan to an Ace Pilot improving his passive defenses and upgrading his Close Combat Expert trait into it’s level II version with Merciless Melee which makes it harder for the enemy to disengage. Then another 50pts to take Master Swordsman making it hard for the enemy to Block. His Commander trait makes him 5″ faster by default and lets him reroll up to 3 Evade dice which will be essential dealing with Mazinger and Diana A who have an excess of shooting.
Garada K7 is a melee unit with good evade and the ability to throw the horns on his head. He does exceptionally well in alternate deployment rules where lets him deploy closer to enemies.
Double M2 is a two headed dragon-like creature with two heat rays. While he’s effective at shooting the enemy his multiple actions will make him great at smashing through buildings.
Key Concepts
Momentum is an army wide resource that represents your armies morale, training, expertise, luck and overall forward Momentum in the flow of battle. You gain Momentum by destroying enemy units, making a melee attack, and surviving the round.
The most common use for Momentum is to protect your units. Lose 1 for each hit you want to negate. Typically Momentum is reserved for high damage attacks like a bazooka or cannon, or versus weapons with high armor penetration such as a beam rifle or beam saber which has a chance to cause catastrophic damage. Momentum can also be used on pilot skills.
Momentum is often expresses as [M+1] or [M-1] which means gains 1 Momentum or loses 1 Momentum.
Return Fire is a crucial part of the activation system and is intended to make the game feel more like a firefight. The way it works is that anytime a unit is attacked, if they haven’t been activated yet you have to activate them next and if possible attack the unit that attacked you. Skilled and Ace pilots can ignore the targeting effect.
Attacks are an abstract concept for each weapon and doesn’t necessarily translate on a 1:1 basis. For instance a beam rifle attack makes 3 shots, you can think of that as three shots in rapid succession or a single well placed shot that would cause significant damage compared to a glancing hit. Many weapons have a Rapid Fire modifier where if the unit gets within 1/2 the maximum effective weapon range they gain more shots (or less shots for artillery and sniper weapons).
Shooting and Evade in MechaStellar the attacker merely needs to declare their target, the defender then needs to roll to evade their attacks. For instance if the attacker makes 3 Shots at Accuracy 10 and the Defender has Evade+3, then they need to roll a 7+ on each die to avoid being hit.
A roll of 9 or 10 automatically Evades regardless of modifiers. A roll of 1 or 2 signifies a critical hit to the Defender, which counts as 2 hits. If the target is within your Sensors range you have Target Lock so 3s also count as Critical Hits. Sniper type units typically have a much higher Sensors range.
When Shooting you can choose Precision for +1 Accuracy or Barrage for +1 Shot. Skilled Pilots improve this bonus to +2. The target can choose to Dodge (+1 Evade) or Guard (+1 Block). Ace Pilots improve this bonus to +2.
In Melee both sides have a die pool (i.e. Melee 5d10) which they split between attack (ATK) and defense (DEF). Every 5+ rolled is a Hit or a Block, while on ATK a 9+ is a Critical Hit which counts as 2 Hits. The attacker gains +1 Hit (+2 for Skilled and Ace Pilots) while the Defender chooses to either Counter (+1 Hit) or Guard (+1 Block), Ace Pilots improve that bonus to +2. Melee is dangerous for everyone involved but typically is not common till Round 3+.
Most units have 1 Action, which they use to either Shoot one weapon or to Full Throttle and move further. Units with the firepower role like the Zaku Cannon or Guntank have additional actions to either shoot an additional weapon or to Focus which lets them either target any unit or gain a bonus Hit.
Skilled & Ace Pilots have access to some very useful free Skills like Improvise, which lets you reroll up to 2 dice, Seize the Day for +1 Action, or Make it Count which gives a number bonus Hits equal to the current Round. Your Commander, even if they aren’t a Skilled Pilot can also make use of these skills.

2 thoughts on “MechaStellar Gameplay Example – Defend the City – Setup”